
Last updated November 16, 2026
 Architectural shingles
 Metal roofing
 Tile roofing
 GAF
 Owens Corning
 Flat & low-slope
Free roof inspection with deck photos before we talk money - GAF and Owens Corning certified installation
Roof Repair Maintenance Checklist for Henderson Homeowners
The most common roof failure we see in Henderson doesn’t start with a storm. It starts with a bead of sealant around a vent pipe that dried out and cracked in June, sat unnoticed through July and early August, and only announced itself when the first monsoon cell rolled through and left a brown ring on a ceiling. By then, the water has been finding its way in for weeks. A roof doesn’t fail all at once here. It fails on a schedule, and that schedule is tied to two stress periods, not four. This guide gives you a Henderson-specific maintenance calendar, the checklists that go with it, and a clear line between what you can safely do yourself and what needs a licensed roofer.
Quick Answer
A Henderson roof needs two focused maintenance passes a year: a pre-monsoon inspection in May or June covering sealant, flashing, and drainage, and a post-monsoon assessment in September covering granule loss, ponding evidence, and soffits. Year-round, check the attic for heat-related decking damage that never shows up from the outside. Most minor failures are sealant and flashing problems, and they’re far cheaper to catch early than to repair after water reaches the ceiling.
Styles & brands we work with
- Architectural shingles
- Metal roofing
- Tile roofing
- GAF
- Owens Corning
- Flat & low-slope
Table of Contents
- Why Henderson Roofs Age on a Two-Season Clock
- Pre-Monsoon Inspection Checklist (May – June)
- Post-Monsoon Damage Assessment Checklist (September)
- The Year-Round Attic Checklist
- What You Can Do Yourself vs. What Needs a Licensed Roofer in Nevada
- How to Document Roof Maintenance for Insurance Claims
- The Henderson Maintenance Calendar, Month by Month
- Repair or Replace? Reading Your Own Roof’s Signals
Why Henderson Roofs Age on a Two-Season Clock
Most of the roof maintenance advice you’ll find online was written for a climate with four distinct seasons: a freeze-thaw winter, a wet spring, a hot summer, and a leaf-fall autumn. That template doesn’t fit Henderson. Our roof has two real stress periods, and they demand different things.
The summer UV stretch runs roughly from late spring through early fall. It’s relentless, dry, and long. Ultraviolet exposure breaks down the oils in asphalt shingles and sealant, causing them to dry, shrink, and crack. This is the slow damage. It doesn’t announce itself. It just quietly ages every sealed joint, every flashing lap, and every inch of exposed shingle.
The monsoon window is brief and violent. When moisture arrives, it often arrives fast and in volume, driving sideways against surfaces that have been baking for months. A hairline crack that was harmless in July becomes an entry point in August. And because our soil and drainage are built for dry conditions, heavy runoff can pond in places it never ponded before.
What this means for you: your maintenance calendar should have two hard dates, not a vague “check it in spring.” One pass in late spring to seal and prepare before the rain. One pass in early fall to assess what the season did. Everything in between is monitoring. Our technicians have up to 10 years of experience reading exactly this pattern in Henderson, and the two-pass rhythm is the single most useful habit we can hand a homeowner.
Pre-Monsoon Inspection Checklist (May – June)
The pre-monsoon pass is the one that prevents ceiling stains. Do it in late May or June, before the summer moisture arrives. The goal is simple: find every place water could enter and make sure it’s sealed and clear.
Sealant integrity is the first priority. Sealant around penetrations is where most Henderson leaks begin, because it dries the fastest in the summer sun. Walk the roof or have it walked and check every place something interrupts the shingle surface:
- Vent pipes and plumbing boots
- Chimney flashing and its counter-flashing
- Skylight frames and curbs
- HVAC and swamp cooler curbs
- Valley flashing where roof planes meet
- Any nail heads or fasteners at the surface
Flashing gaps come second. Look for lifting, rust, or separation where metal flashing meets shingle or wall. A gap you can see daylight through is a gap water will find.
Drainage clearing ties it together. Clear debris from valleys, behind chimneys, and along any low spots. In our dry conditions, buildup of blown dust and debris can sit unnoticed and hold water against the roof when the rain finally comes.
A structured pre-monsoon walk-through looks like this:
- Clear all debris from valleys and drainage paths.
- Inspect and photograph every sealant joint around penetrations and flashing.
- Check for lifted, cracked, or missing shingles.
- Confirm flashing is tight at walls, chimneys, and curbs.
- Note and photograph anything questionable for follow-up.
If you’d rather not be on the roof, a standalone diagnostic inspection is the right starting point. We inspect before we recommend; you get a plain assessment of what’s actually there before anyone talks about repairs.
Post-Monsoon Damage Assessment Checklist (September)
The monsoon window is brief, but it leaves fingerprints. The September pass is about reading what the season did and catching problems before the dry months set them in. This is also where roof repair needs in Henderson most often come from.
Granule loss is the first thing to check. Asphalt shingles are surfaced with granules that protect the asphalt beneath from UV. After a season of rain and sun, look for granule accumulation in valleys and at the base of downspouts, or bare patches on shingle faces where the granules have worn away. Heavy granule loss means the shingle is aging faster than you’d like.
Ponding evidence is second. Even in a short rainy window, water can pool in low spots or behind debris dams. Check for dark water stains, mud rings, or debris lines that show where water stood. Standing water breaks down shingle sealant and finds flashings.
Soffit inspection matters more than people think. Look up under the eaves for water staining, discoloration, or soft spots. Soffits that took on water during a storm can hold moisture against the structure. Pull back and look at the fascia edge too.
A post-monsoon assessment:
- Check valleys and downspout outlets for granule buildup.
- Look for water stains, mud rings, and ponding evidence on the roof surface.
- Inspect soffit, fascia, and eaves for staining or soft material.
- Re-check all sealant and flashing joints for new cracking or separation.
- Photograph everything, especially anything new since the spring pass.
If you spot interior stains after a storm, don’t just paint over them. A stain means water is finding a path, and the path needs to be found.
The Year-Round Attic Checklist
Your best diagnostic tool in Henderson isn’t on the roof. It’s under it. The attic reveals damage that exterior inspections miss, especially heat-related decking degradation, which is a slow burn in our climate.
Summer heat cooks the attic space, and while a properly ventilated attic manages it, an under-ventilated one can push temperatures high enough to stress the roof decking from below. Decking that’s been heat-cycled can dry, warp, or lose integrity in ways you can’t see from the outside. This is the part a roof inspection from a ladder alone will never catch.
Check the attic on a schedule you can actually keep, once a season:
- Staining on the decking or rafters: brown rings or streaks mean water has been entering and drying.
- Sagging or soft decking: press gently on joists and sheathing; softness suggests moisture or heat damage.
- Brittle or crumbly insulation: moisture collapses insulation, and degraded insulation can’t protect the home.
- Daylight through the roof deck: any visible light from below is a direct opening.
- Ventilation pathways: confirm soffit and ridge vents aren’t blocked by insulation or debris.
- Corrosion on fasteners and hardware: rusty nails or connectors signal moisture exposure.
Bring a flashlight and take photos. A dated attic photo of a dry, intact decking today is valuable evidence of a well-maintained roof if you ever need to file a claim later. A serious finding, like soft sheathing or daylight, is a reason to call a roofer rather than put it off.
What You Can Do Yourself vs. What Needs a Licensed Roofer in Nevada
Some roof maintenance is straightforward and safe for a homeowner. Some of it can void your warranty or put you in danger if done yourself. In Nevada, the dividing line matters for both safety and paperwork.
Legitimate DIY tasks:
- Clearing gutters and removing debris from valleys from a safe position.
- Visual checks from the ground with binoculars: shingles, flashing, and overall condition.
- Taking dated photos of the roof and attic conditions from safe vantage points.
- Interior checks: attic staining, ceiling water marks, and insulation condition.
Tasks that should go to a licensed roofer:
- Any actual climbing onto the roof, especially a steep or multi-story roof.
- Flashing repair or replacement, which requires proper layering and materials to seal correctly.
- Sealant reapplication at penetrations, which fails fast if the wrong product is used on the wrong surface.
- Shingle repair or replacement of any kind.
- Anything involving structural assessment, sheathing, or the roof deck.
Here’s the part most homeowners don’t hear: repairs done by an unlicensed party can work against a warranty claim. If a shingle system is later shown to have been disturbed by a non-qualified installer, a manufacturer may push back on coverage. That’s especially relevant when your roof is installed with a system from GAF, Atlas, or another manufacturer, because those systems are warrantied as complete assemblies. The repair itself may look fine while quietly putting the warranty at risk. Match any shingle, fix any system is the principle, but the “who does the work” question is just as important as the material.
Roof work in Henderson also often touches things like flashing, drainage, and code details specific to the area. A licensed roofer knows what to check and what a permit or inspection may require. For anything beyond a visual check, the licensed route is the one that keeps you covered. Repair when possible, replace when necessary; but let it be licensed and documented.
How to Document Roof Maintenance for Insurance Claims
If you ever file a roof claim, the difference between a smooth process and a frustrating one is usually the paper trail. Photos taken before a problem and after maintenance are evidence. Most homeowners have none of it, and that’s a preventable gap.
Documentation that actually supports a claim:
- Dated, wide shots and detail shots. Photograph the whole roof plane and then close-ups of each penetration or flashing joint. Timestamps matter.
- The attic evidence. A photo of dry, intact decking taken at maintenance time proves the roof was in good condition before an event.
- Maintenance records. Keep a simple log of what was checked, when, and by whom, including any professional inspection reports.
- Pre- and post-storm comparison. A spring photo of a sealed joint and a fall photo of the same joint after a storm tell a clear story.
- Receipts and invoices for any professional work. Repairs done by a licensed roofer are documents an insurer understands.
Two habits do most of the work. First, photograph at every seasonal pass, not just when something looks wrong. Second, keep the maintenance log even if it’s a note on a phone: date, what was checked, what was found. If a storm hits and the insurer asks about the roof’s prior condition, a dated history is far stronger than a memory. A standalone inspection report from a roofer is a valuable piece of that record, because it documents condition from a professional’s perspective before any claim is filed.
The Henderson Maintenance Calendar, Month by Month
Here’s the whole guide in a single schedule. Two heavy passes, lighter monitoring in between. This is the checklist Henderson homeowners can actually keep.
January – February: quiet monitoring.
- Interior checks only: look for ceiling stains and attic moisture.
- Confirm attic ventilation isn’t blocked.
March – April: the pre-season walk.
- Visual exterior check from the ground: shingles, flashing, debris.
- Clear debris from accessible drainage areas.
May – June: the pre-monsoon pass. This is the important one.
- Full sealant integrity check around every penetration.
- Flashing inspection and tightening.
- Drainage clearing.
- Schedule a written inspection if anything looks questionable. We inspect before we recommend, and this is the ideal time to book it.
July – August: monsoon season, watch and wait.
- After any storm, check for interior stains and inspect from the ground.
- Note any new granules at downspouts.
September: the post-monsoon assessment.
- Granule loss, ponding evidence, soffit inspection.
- Re-check sealant and flashing for new cracking.
- Photograph everything.
October – December: prep for the dry stretch.
- Clear fallen debris.
- Review your documentation and maintenance log.
- If a repair was flagged during the year, get it scheduled before the next cycle.
Repair or Replace? Reading Your Own Roof’s Signals
One of the most common questions we hear in Henderson is whether a problem means repair or full replacement. As a repair-first company, our default answer isn’t “replace.” The right answer depends on what the roof is telling you, and most roofs give clear signals.
Signs that usually point to a straightforward fix:
- A single leak at a defined penetration or flashing point.
- Cracked sealant with sound shingles around it.
- Localized damage from one event, with the surrounding area intact.
- Aging but intact shingles with a repairable defect.
Signs that suggest a larger conversation:
- Widespread granule loss across multiple planes.
- Multiple leaks not tied to a single point.
- Soft or heat-degraded decking found in the attic.
- A roof that has had repeated repairs in a short span.
When it comes to replacement, material fluency matters. Roof systems are warrantied as assemblies, and matching an existing system, whether it’s Tamko, Boral, or another maker, preserves both the continuity of coverage and the way the roof looks from the street. It also means the recommendation is driven by what the roof needs, not by a single supplier’s shelf. Seven brands, one honest assessment: that’s the framework a homeowner deserves when a repair turns into a replacement decision.
Common Mistakes to Avoid
- Skipping the spring pass because the roof looks fine. In Henderson, the failures you’ll see from the ground are the big ones. The sealant cracks you’ll eventually feel from your ceiling are invisible from a distance.
- Letting sealant go unexamined through the summer. The summer UV stretch is what dries it out. Sealing before August is what prevents the damage it causes.
- Only inspecting the exterior. Heat-related decking damage in the attic won’t show up on the roof surface. If you never look inside, you never see it.
- Painting over a ceiling stain. A stain is evidence of an active path. Covering it hides the symptom and lets the repair cost grow.
- DIY flashing or shingle work to save a little money. A poor repair is costly, and it can put a manufacturer’s warranty in question. A licensed roofer keeps the claim path clean.
- Not taking photos. The homeowner with dated before-and-after photos has a far easier insurance conversation than one with only a memory.
- Waiting until a leak is obvious. The most common Henderson failure is a sealant crack that went unnoticed for weeks. Catching it early is the whole point of the checklist.
See the difference
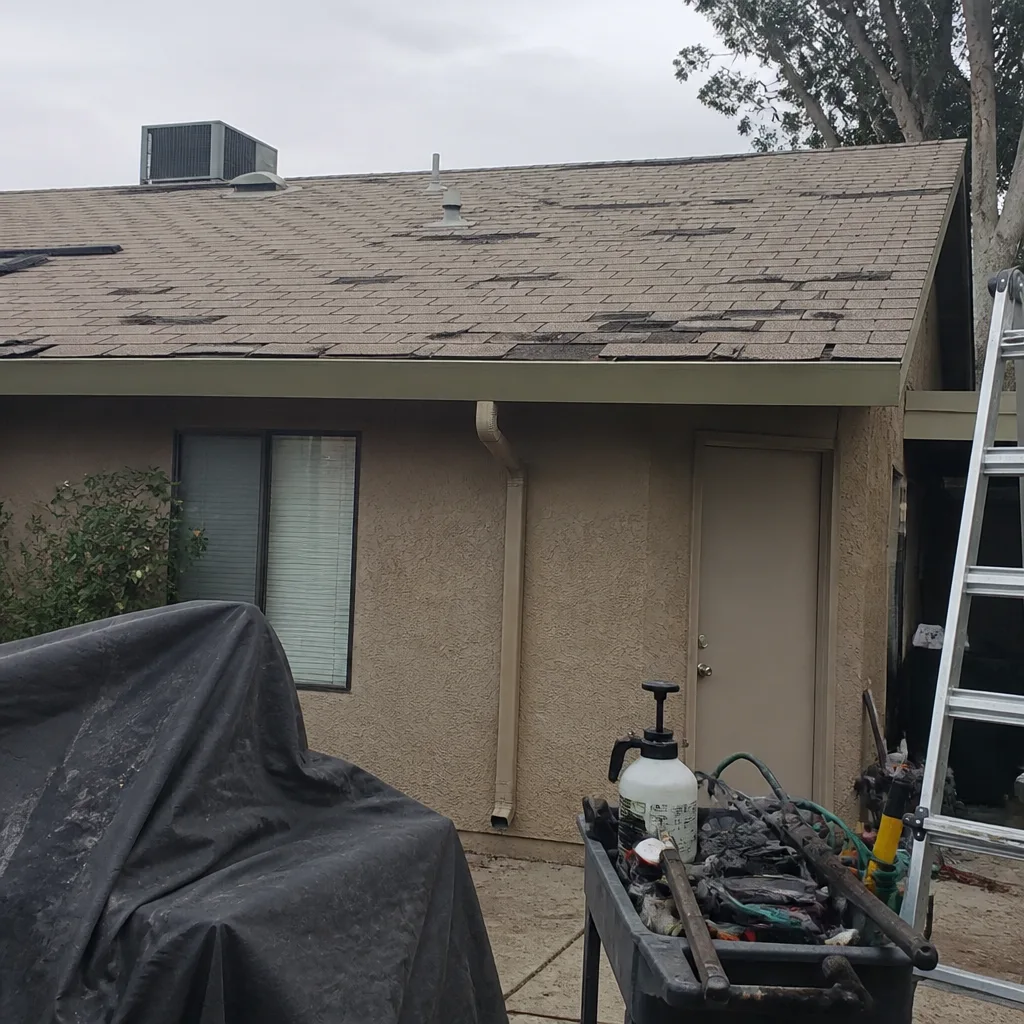 Before
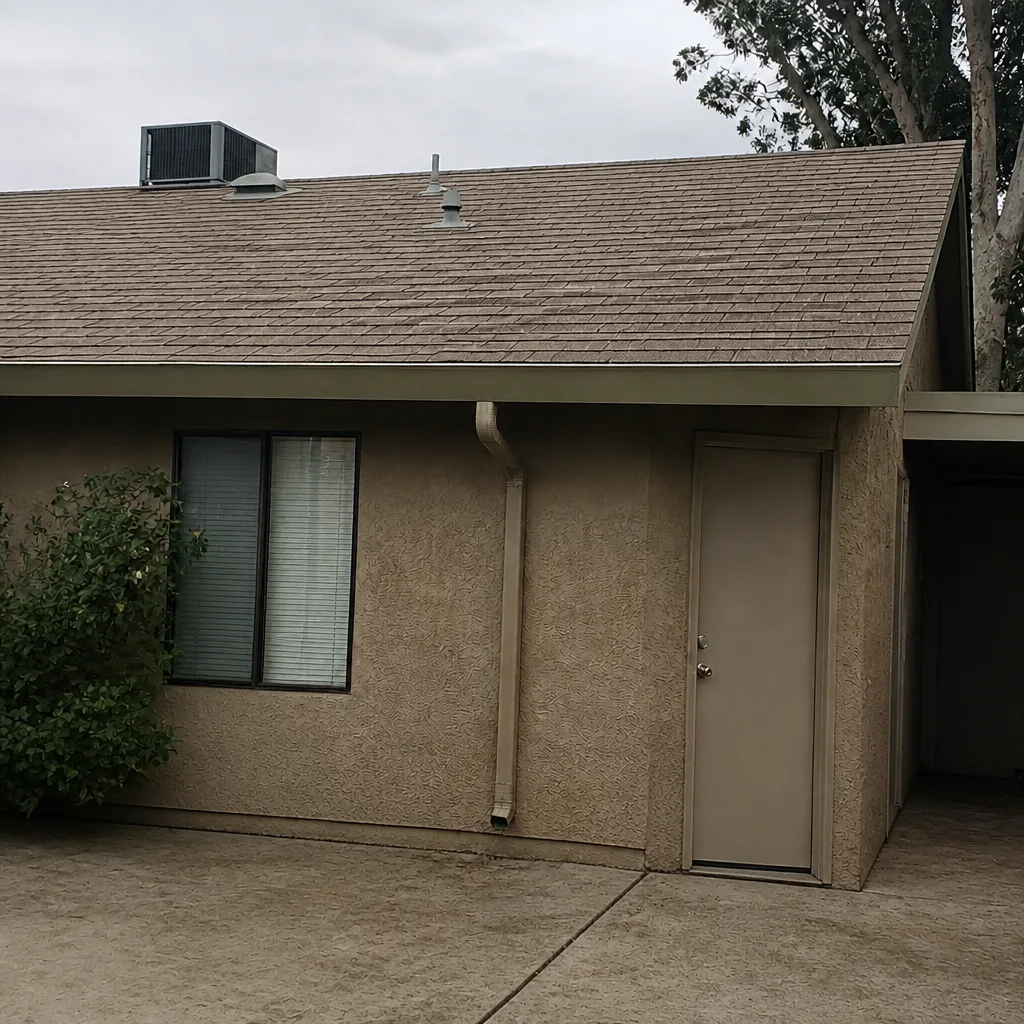 After
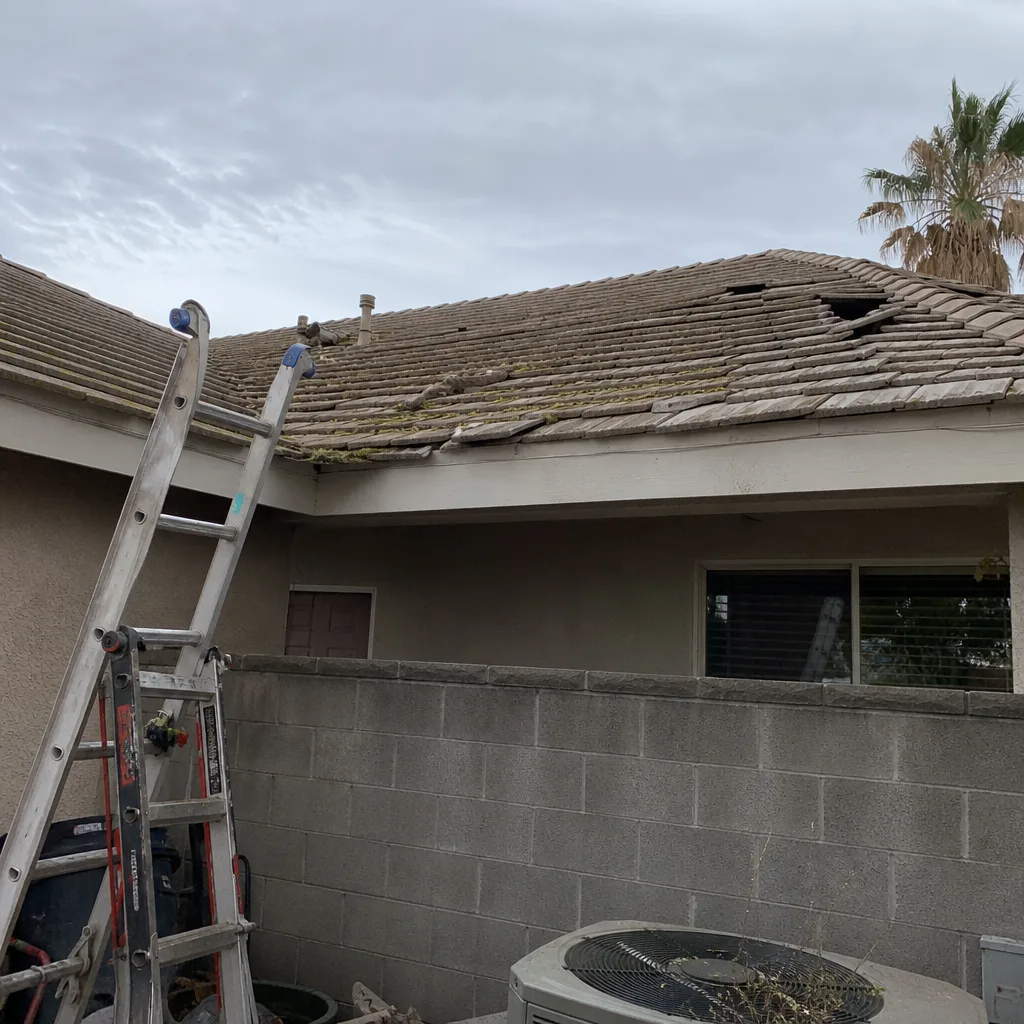 Before
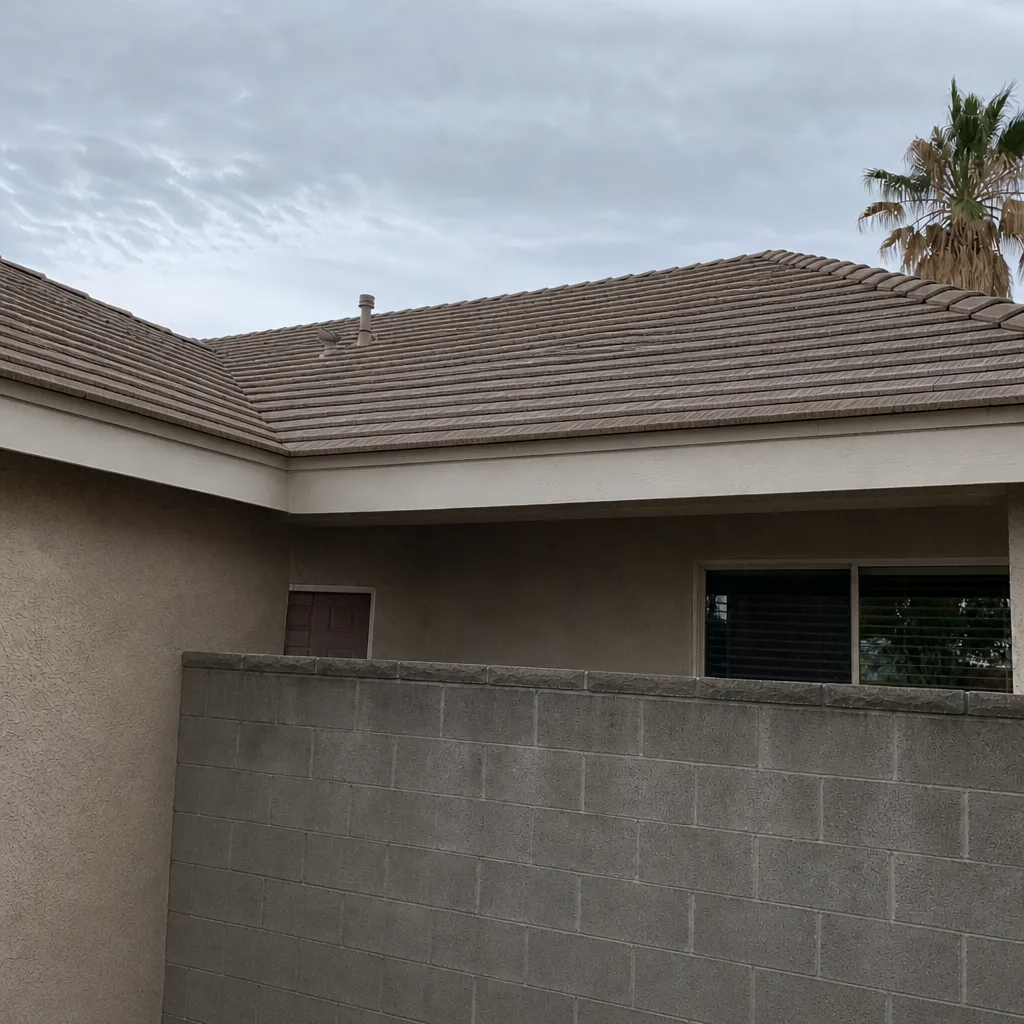 After
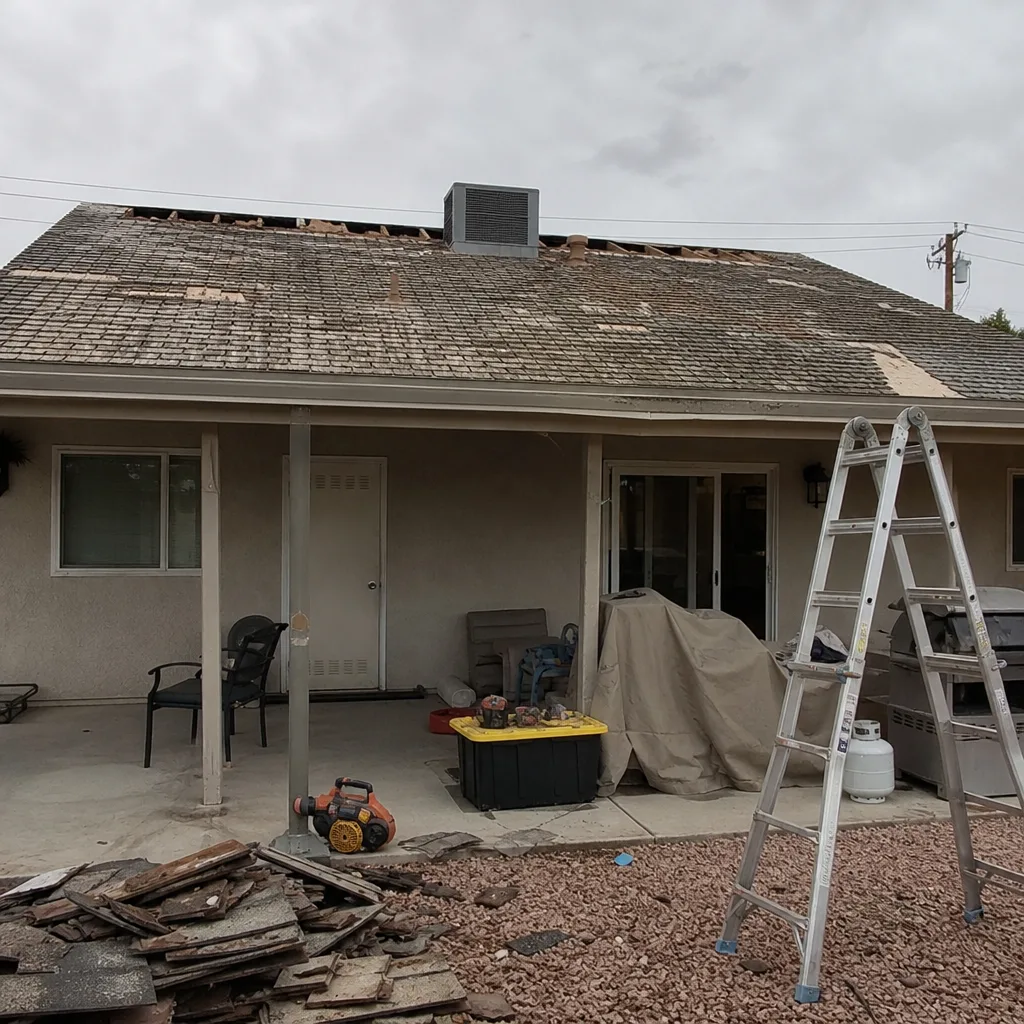 Before
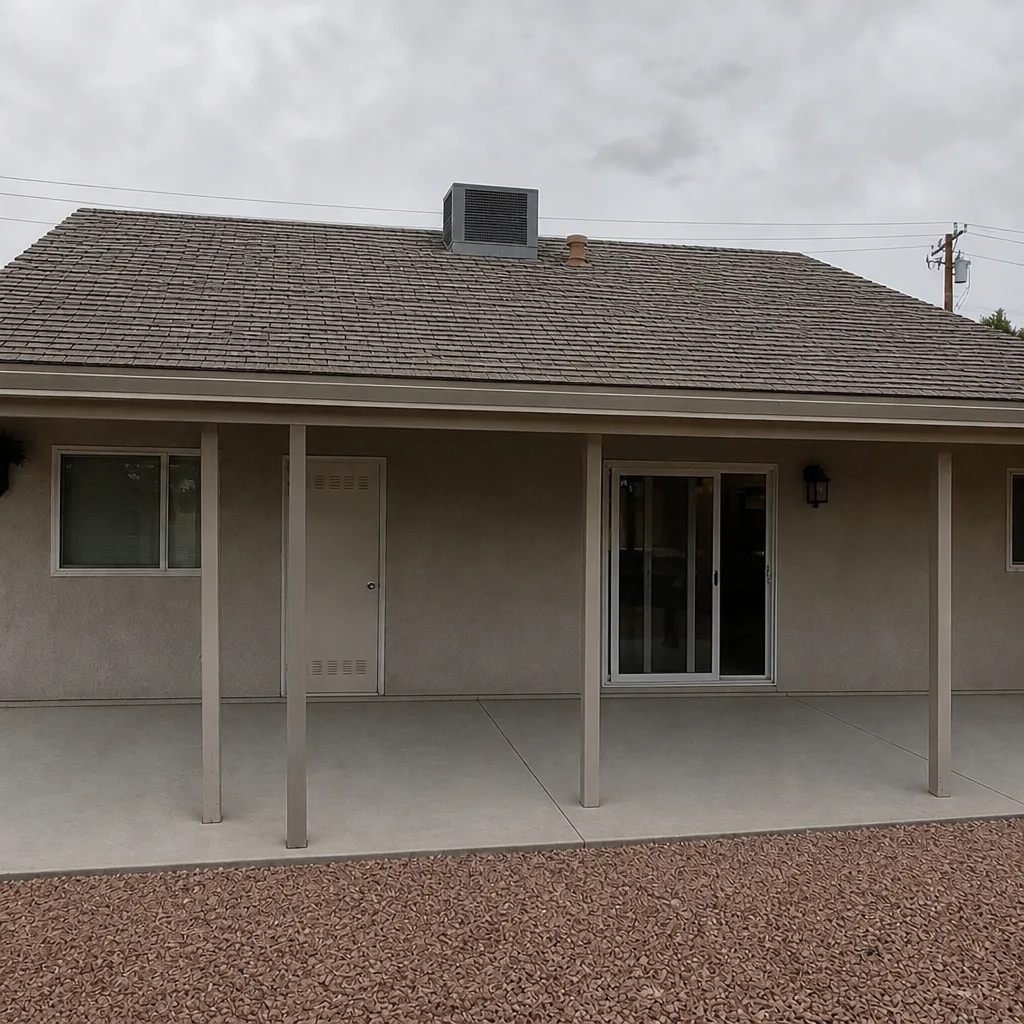 After
When to Call a Professional
Call a roofer when you find daylight through attic decking, soft or warped sheathing, water stains spreading on a ceiling or wall, granule loss across a large area, or repeated leaks in the same spot. Call when flashing is lifted or separated, when a storm leaves displaced shingles or visible damage, or when you’re not comfortable getting on the roof at all. And call for a scheduled inspection before the monsoon season if the spring pass turns up more than minor debris. Roof work involves heights and surfaces that get slippery, and it’s genuinely safer left to a licensed roofer who knows what to look for. Delmar Roof Repair offers free estimates in Henderson – call (833) 519-6453. We answer 24/7. Fast dispatch from 7am to 7pm, Sunday through Friday.
Frequently Asked Questions
Twice a year does the work for most Henderson roofs: once in May or June before the monsoon window, and once in September after it. Add an attic check each season, because heat-related decking damage only shows up from inside. If you’d rather not climb, a standalone roof inspection gives you a documented starting point.
Sealant around penetrations is usually first. The long, dry summer bakes it, it dries out and cracks, and the monsoon season finds it. That’s why the pre-monsoon pass centers on sealant integrity and flashing. A cracked bead you catch in June is a minor fix; one you catch in August after it leaks can mean interior repair.
Yes for gutter clearing, valley debris removal, and visual checks from the ground or with binoculars. No for anything that means climbing onto the roof or touching the shingles and flashing. Flashing and sealant work needs a licensed roofer, and repairs done by anyone else can put a manufacturer’s warranty in question. roof repair that’s done right protects the whole system.
Hail is uncommon here, so it’s rarely the culprit. Storm and impact damage in Henderson usually shows up as granule loss, flashing knocked loose, and runoff ponding after a heavy rain. The post-monsoon checklist targets those, not hail, because they’re what actually happens in our climate.
A single leak at a defined penetration, cracked sealant, or one localized area of damage usually points to repair. Widespread granule loss, multiple leaks, or soft decking in the attic points to a larger conversation. We inspect before we recommend, so the answer comes from the roof, not from a default assumption. If roof replacement turns out to be the honest answer, we’ll match your existing shingle system rather than push a brand switch.
Yes. Dated photos and a simple maintenance log show the roof’s condition before a storm, which is exactly what an insurer needs to assess a claim. Take wide and detail shots at each seasonal pass, keep any inspection report, and log any professional repairs. It takes minutes and it changes the whole conversation if you file.
The Bottom Line
Henderson roofs age on two stress periods, not four, and your maintenance list should follow that clock. Seal and prepare before the monsoon window in late spring. Assess granule loss, ponding evidence, and soffits after it in September. Check the attic year-round for heat-related decking damage the exterior hides. Know the line between safe DIY and licensed work, and photograph everything as you go. Catching a $30 sealant crack in June is the whole game. Whether you handle the light tasks yourself or bring in a roofer, a two-pass calendar keeps the roof honest and the costs small.
When you’re ready for a professional eye, we start with an inspection and tell you what’s actually there. Delmar Roof Repair works across Henderson and the surrounding area, fixes roofs with materials from GAF, Atlas, Tamko, and other major makers, and treats repair as the first answer, not the last. Call (833) 519-6453 for a free estimate. We answer 24/7. Fast dispatch from 7am to 7pm, Sunday through Friday. If you’d like to see how we approach the whole job, start with Delmar Roof Repair.
Written by the team at Delmar Roof Repair.